Welcome back to TueDuesday:
A Weekly Series on Self Improvement (and Self Preservation), where I’ll
share some of the hard-earned tips and tricks that have made their way up my
sleeve after well over a decade of living alone in the city.
TueDuesday goes out to all of you who have ever bravely moved into
your very own apartment, only to encounter a cockroach the size of a well-fed
hamster. Barefoot. In the middle of the night. To all the
ambitious drinkers who ever wanted to score the bartender’s number (and to the
many of us who have failed, only to bravely try again). To the pasta
fiends. To the Facebook lurkers. To the happy, the hopeful, and the
possibly hung-over guys and gals like me, navigating the city streets – or the
country roads – without benefit of a map or a significant other. Whether
you’re chronically single, newly separated or happily coupled up and just
looking for a way to make the occasional table for one a little more fun,
there’s something here for you.
Like what you see? Pass it along! Strongly
disagree? Say so in the comments! (Respectfully, please; after
growing up with the last name Blewett, my ego can only take so much.)
Have an idea for a future TueDuesday post? Send it over! And keep
in touch, via Twitter @LeahKBlewett and Instagram @leahkblewett.
Happy TueDuesday!
TueDuesday, June 9, 2015
Dress Up Your Digits: The
Tuxedo Manicure
With deadlines pressing down on me from all sides, this week’s
TueDuesday is a true twofer: I need a manicure, and I don’t have any damned
time to get one or money to pay for one.
Instead, here’s one of my favorite tricks to make your fingertips look lovely
with surprisingly little effort: The
Tuxedo Manicure. James Bond-style martini
optional (but strongly encouraged…just wait until they’re dry!)
First, let’s talk supplies.
You’ll need…
*** An emery board. Maybe your natural nails are less unruly than
mine, and to that I say, lucky you. But
mine get jagged if I so much as think
about touching anything harder than my pillow, so I always give them a quick
file to smooth out the edges and even out the length before I start painting.
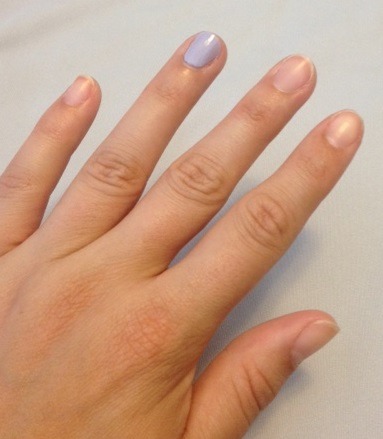
*** A light, solid color
for your ring fingers. They’re the ones
suiting up, so neutral pink or beige is a good choice. White makes for a dramatic contrast. I myself am a fan of unusual colors, so that
lavender you see? That’s the dress shirt
to my fingernail tuxedo.
*** A second, contrasting
color for the rest of your nails.
You can always paint them all the same color, but a subtle contrast here
is a great way to tie the look into the rest of your outfit (or match your
pedicure without being all Barbie about it).
I’m using the same shimmery gold currently adorning my tooties. If you chose white as your background for the
tux, consider going all-out and painting the rest of your nails drop-dead
red. You’ve just earned that martini,
girl.
*** A black nail art pen. Mine is Sally Hansen, because I am nothing if
not frugal (the glamourous life of abject writerly poverty that I chose has its drawbacks), but you can just as easily use any brand you like. You can also opt for a paint marker from any arts-and-crafts store, as long as you choose
an ultra-fine point, or even a black
Sharpie in an absolute emergency.
Keep in mind that these will tend to bleed more than nail pens when you
apply your topcoat, and this manicure won’t last a minute without one, so it
can’t hurt to spring for the real thing.
And while black is definitely the tux-iest looking color, feel free to
play around! I love my metallic paint
markers, and no one ever said you couldn’t contrast your bowtie with your buttons
and cummerbund. It’s a manicure, not a
mandate. Let’s have some fun.
*** A quick-drying topcoat. The Sally Hansen “Dries Instantly” really
does, and it doesn’t get goopy the way other topcoats can, so that’s my
move.
On to the action! The only
really critical part here is letting
your nails dry before attempting to draw on your tuxedos, then letting the designs dry before sealing
them in place with topcoat. I’ll be
tempting fate and multi-tasking by typing while they dry, but if you’ve been
waiting to binge-watch 30 Rock, fire
up Netflix and kick back for an hour or two while you complete this process.
Another quick note before we begin: it’s likely that you’ll eff this up at least once. No worries – it’s just nail polish! Remove it and start again. That’s why I start with the ring fingers:
they’re the most difficult, and if I need to do over, I don’t risk ruining all
of my other nails with polish remover.
Hand steady? Martini fixins
at the ready? Polishes selected? Nail pen acquired? Let’s do this.
Start with your light, solid color and paint each of your ring fingers.
I’m assuming most of you know home-manicure basics, but it bears
repeating that you should aim to get the color as close as possible to your
cuticles without touching them. If you
do, take the polish off and start over; otherwise, it will dry connected to the
cuticle, creating a ragged edge that will peel up as your nail grows away from the
nailbed. This will probably take at least two coats, but I try to avoid
going up to three, if I can, in order to save myself from spending the rest of my day and
night waiting for the final product to dry.
Ain’t nobody got time for that.
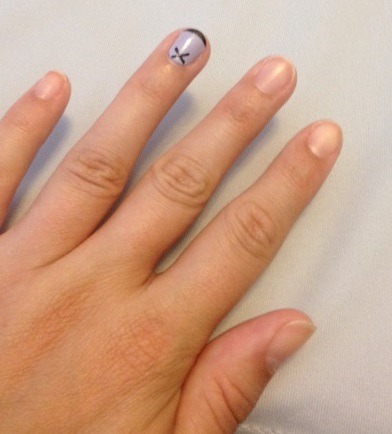
Once your ring fingers are painted, the fun really begins: bust out your nail pen. I find that mine gets a little ornery about
how long I tend to wait between uses, so maybe try out the tip on a paper towel until it’s running smoothly. Then, give
yourself a black French manicure.
If you’re worried about the steadiness of your hand while doing
this, start with a very narrow line
at the absolute tip of your nail and draw backwards from there. You’re only doing one nail per hand, so they
needn’t be absolutely the same width, anyway.
People are going to be way too captivated by your clever nail art to
notice. You will also probably get some
ink on your skin. This is totally okay,
especially if you went with a nail art pen: once you paint on the topcoat, it
will seal the ink onto your nails and allow it to wash right off your skin like
nothing was ever there. Next, draw an X near your nailbed.
Easy, right? You’re doing
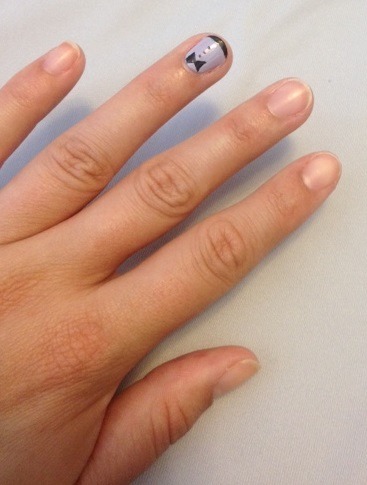
great. Now, close off the two triangles and color them in.
Hard part: virtually over!
Now, just draw three little dots
between the center of the X and the French tip.
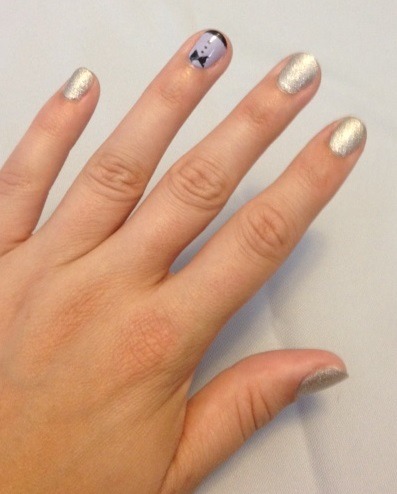
Your nails look so adorably formal! Now let
them dry, then seal in your design
with topcoat. Finally, paint the rest of your nails with your
second, contrasting color. Check you
out! Your hands look playful and
colorful, perfect for a summer wedding or a night out with friends. You’d never know, looking at my nails, that I
spent this entire sunny summer TueDuesday indoors typing, would you??
I’ve got to get back to the deadline grind, but in the interest of
keeping you coming back (and myself on my self-imposed weekly schedule), here’s
the first-ever TueDuesday Teaser…
Next week:
get ready for DIY wine slushies (it’s way
easier than you think) as we learn How
to Pack a Picnic!


No comments:
Post a Comment